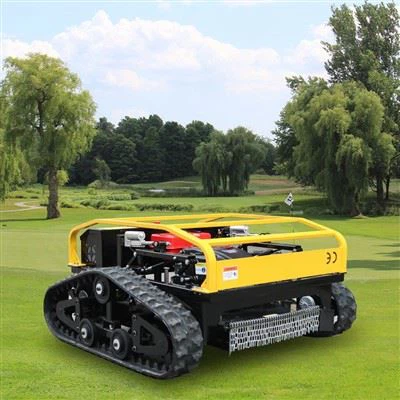
As a supplier of remote mowers, I often receive inquiries from customers about how to assemble these useful machines. In this blog, I'll guide you through the process of assembling a remote mower step - by - step.
Preparation Before Assembly
Before you start assembling your remote mower, it's essential to make sure you have all the necessary tools and components. You'll typically find a detailed parts list in the user manual that comes with your mower. Commonly, you'll need basic tools such as a wrench, screwdriver, and pliers.
First, lay out all the parts on a clean, flat surface. This will help you organize everything and ensure that you have all the pieces. Check for any signs of damage or missing parts. If you notice anything amiss, contact our customer service immediately. We take pride in providing high - quality products, and we'll do our best to resolve any issues.
Assembling the Chassis
The chassis is the foundation of your remote mower. Start by identifying the main frame of the chassis. It's usually the largest and sturdiest part of the mower. Look for the pre - drilled holes on the chassis where other components will be attached.
Next, attach the wheels or tracks to the chassis. If your mower is equipped with tracks, like the Remote Control Lawn Mower With Tracks, carefully align the track system with the designated mounting points on the chassis. Use the provided bolts and nuts to secure the tracks firmly. Make sure the tracks are properly tensioned; a loose track can cause the mower to malfunction, while an overly tight track can put unnecessary stress on the components.
For mowers with wheels, install the wheel axles into the corresponding holes on the chassis. Secure the axles with washers and nuts, and then attach the wheels to the axles. Ensure that the wheels rotate freely without any wobbling.
Installing the Cutting Deck
The cutting deck is a crucial part of the remote mower as it's responsible for cutting the grass. Locate the mounting brackets on the chassis where the cutting deck will be attached. These brackets are usually designed to fit the specific model of the cutting deck.
Carefully lift the cutting deck and align it with the mounting brackets. Insert the bolts through the holes in the deck and the brackets, and then tighten the nuts. Make sure the cutting deck is level and parallel to the ground. You can use a spirit level to check the alignment.
Once the cutting deck is attached, connect the drive belt or chain that transfers power from the engine or motor to the cutting blades. Refer to the user manual for the correct routing of the belt or chain. Ensure that it is properly tensioned; a loose belt or chain can cause the blades to stop rotating, while an overly tight one can damage the drive system.
Mounting the Engine or Motor
The power source of your remote mower, whether it's an engine or an electric motor, needs to be installed securely. Identify the mounting platform on the chassis where the engine or motor will be placed.
If you're installing an engine, carefully lower it onto the mounting platform. Align the holes in the engine with the holes in the platform, and then insert the bolts and tighten the nuts. Connect the fuel lines, if it's a gasoline - powered engine, following the instructions in the manual. Make sure there are no leaks in the fuel system.
For an electric motor, attach it to the mounting platform in a similar way. Connect the electrical wires according to the wiring diagram provided. Ensure that all connections are tight and insulated to prevent electrical shorts.
Attaching the Remote Control System
The remote control system allows you to operate the mower from a distance. Start by installing the receiver unit on the mower. Find a suitable location on the chassis where the receiver can be mounted securely and where it will have a clear line of sight to the remote control transmitter.
Use the provided mounting hardware to attach the receiver to the chassis. Connect the receiver to the various components of the mower, such as the motor or engine controls, steering mechanism, and cutting deck controls. Refer to the wiring diagram in the user manual to ensure correct connections.


Next, pair the remote control transmitter with the receiver. This usually involves following a specific pairing procedure, such as pressing certain buttons on the transmitter and receiver simultaneously. Once the pairing is successful, test the remote control by moving the mower forward, backward, and turning it left and right.
Adding Safety Features
Safety is of utmost importance when using a remote mower. Install the safety sensors, such as the collision sensors and tilt sensors. These sensors are designed to stop the mower's operation in case of an unexpected impact or if the mower is tilted beyond a certain angle.
Attach the sensors to the appropriate locations on the mower, as indicated in the user manual. Connect the sensors to the control system of the mower. Test the sensors to ensure they are working properly by gently bumping the mower or tilting it slightly.
Final Checks and Testing
After assembling all the components of the remote mower, it's time to perform a final check. Inspect all the bolts and nuts to make sure they are tightened properly. Check the fluid levels, if applicable, such as the engine oil or battery electrolyte.
Fill the fuel tank or charge the battery, depending on the power source of your mower. Start the engine or turn on the electric motor and let it run for a few minutes to warm up. Listen for any unusual noises or vibrations, which could indicate a problem with the assembly.
Use the remote control to operate the mower in a safe and open area. Test all the functions, including forward and backward movement, turning, and cutting. Observe the mower's performance and make any necessary adjustments.
Conclusion
Assembling a remote mower can be a rewarding experience, but it requires careful attention to detail. By following these steps and referring to the user manual, you can ensure that your mower is assembled correctly and ready to use.
If you have any questions during the assembly process or if you're interested in purchasing a remote mower, feel free to contact us. We're here to provide you with the best products and support. Whether you're looking for a Remote Control Grass Cutter or a Self Propelled Garden Remote Control Lawn Mower, we have a wide range of options to meet your needs.
References
- Manufacturer's user manual for the remote mower.
- Technical specifications provided by the mower's production team.