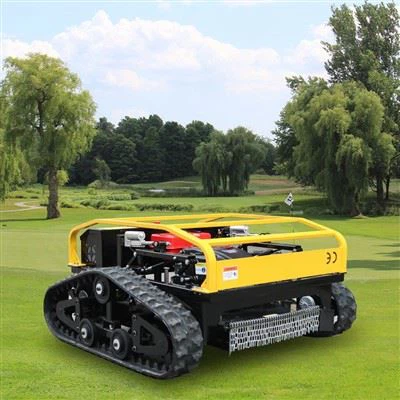
Installing a remote mower can seem like a daunting task, but with the right guidance and a bit of patience, it can be a straightforward process. As a trusted remote mower supplier, I'm here to walk you through each step of the installation process to ensure you can get your remote mower up and running smoothly.
Step 1: Unpacking and Inspection
The first step after receiving your remote mower is to carefully unpack it from its shipping container. Inspect all the components for any signs of damage during transit. This includes checking the mower itself, the remote control unit, and any additional accessories that may have come with your purchase. If you notice any damage, contact our customer support team immediately. We take pride in providing high - quality products, and we'll work with you to resolve any issues promptly.


Step 2: Familiarizing with the Components
Before you start the installation, take the time to familiarize yourself with all the components of the remote mower. Our remote mowers come in various models, each with its own unique set of features. For example, our Remote Control Mower is designed for precision cutting, while the Remote Control Rotary Lawn Mower Automatic Robot Lawnmower offers automated functionality.
The mower typically consists of the main cutting deck, the chassis, the motor, and the track system (in the case of Remote Control Lawn Mower With Tracks). The remote control unit allows you to operate the mower from a safe distance, providing controls for forward and reverse movement, steering, and blade activation.
Step 3: Assembly
The assembly process may vary depending on the specific model of your remote mower. However, most remote mowers come with detailed assembly instructions. Here is a general guide on how to assemble a typical remote mower:
Attaching the Tracks (if applicable)
If your mower has tracks, start by aligning the tracks with the track wheels on the chassis. Some tracks may have a locking mechanism that you need to engage to secure them in place. Make sure the tracks are properly tensioned. An overly loose track can cause the mower to lose traction, while an overly tight track can put unnecessary stress on the track system and the motor.
Mounting the Cutting Deck
Lift the cutting deck and align it with the mounting points on the mower chassis. Insert the bolts or pins provided in the assembly kit and tighten them securely. Check that the cutting deck is level and can rotate freely.
Connecting the Electrical Components
Connect the electrical wires from the motor, the blade, and any other electrical components to the corresponding ports on the mower's control panel. Make sure the connections are tight and free from any corrosion or damage. This step is crucial as a loose connection can lead to electrical problems and affect the performance of the mower.
Installing the Remote Control Receiver
Locate the remote control receiver on the mower and attach it firmly in place. The receiver is responsible for receiving the signals from the remote control unit. Ensure that the antenna on the receiver is fully extended and unobstructed to provide optimal signal reception.
Step 4: Battery Installation and Charging
Most remote mowers are powered by rechargeable batteries. Carefully remove the battery cover on the mower and insert the battery into the battery compartment. Make sure the battery is properly seated and the connections are secure.
Before you start using the mower, fully charge the battery. Refer to the user manual for the specific charging time and instructions. Overcharging or undercharging the battery can reduce its lifespan and affect the performance of the mower.
Step 5: Programming the Remote Control
The next step is to program the remote control unit to work with your mower. This usually involves pairing the remote control with the receiver on the mower. Follow the instructions in the user manual to enter the pairing mode. Press the appropriate buttons on the remote control and the mower's receiver until the pairing is successful. You may need to test the remote control by operating the mower through its basic functions, such as forward and reverse movement, to ensure the pairing is working correctly.
Step 6: Initial Testing
Once everything is assembled and the remote control is paired, it's time for an initial test. Find a flat and open area away from any obstacles or people. Turn on the mower and use the remote control to operate it. Check the movement of the mower in different directions, including forward, reverse, and turning. Also, test the blade activation to ensure the blades are spinning properly.
Pay attention to any unusual noises or vibrations during the test. If you notice any issues, stop the mower immediately and refer to the troubleshooting section of the user manual or contact our technical support team for assistance.
Step 7: Safety Checks
Before you start using the remote mower on your lawn, conduct a thorough safety check. Make sure all the safety features on the mower, such as the emergency stop button on the remote control and the blade guard on the mower, are in working condition. Also, check the surrounding area for any potential hazards, such as rocks, toys, or other debris that could be thrown by the spinning blades.
Step 8: Maintenance Tips
To keep your remote mower in optimal condition, regular maintenance is essential. After each use, clean the mower to remove any grass clippings, dirt, or debris. Check the tracks (if applicable) for wear and tear and replace them if necessary. Also, inspect the blades regularly and sharpen or replace them when they become dull.
Conclusion
Installing a remote mower may seem like a complex process, but by following these steps, you can have your mower up and running in no time. As a remote mower supplier, we are committed to providing you with high - quality products and excellent customer service. If you have any questions or need further assistance during the installation process, our team of experts is always ready to help.
If you're interested in purchasing a remote mower or have any inquiries about our products, we encourage you to contact us for a procurement discussion. We can provide you with detailed product information, pricing, and shipping options to meet your specific needs.
References
- Remote Mower User Manuals
- Industry best practices for remote mower installation and maintenance