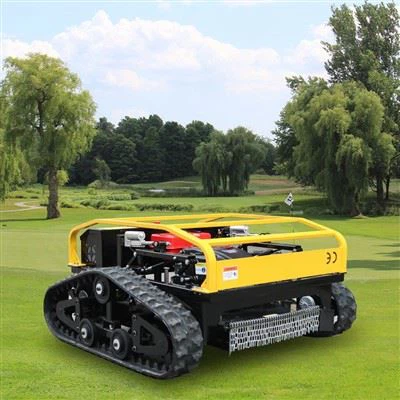
Setting the cutting pattern of a remote mower is crucial for achieving an efficient and aesthetically pleasing lawn. As a supplier of Remote Mower, I've had my fair share of experiences and insights on this topic. In this blog, I'll walk you through the steps and considerations to set the cutting pattern for your remote mower like a pro.
Understanding Your Remote Mower
First things first, you gotta know your machine inside out. Different remote mowers come with various features and capabilities. Some Remote Control Mower models are more advanced, offering multiple cutting patterns and adjustable settings right from the remote control. Others might be a bit more basic, but you can still get creative with how you operate them.
Take a look at the mower's manual. Yeah, I know it's a bit of a drag to read all that fine print, but it's worth it. The manual will tell you about the mower's cutting width, the types of patterns it can support, and any specific limitations. For instance, if your mower has a narrow cutting width, you might need to plan more overlapping passes to cover the entire lawn evenly.
Assessing the Lawn
Before you start setting the cutting pattern, give your lawn a good once - over. Note down the size, shape, and any obstacles in the area. Is it a small, square backyard or a large, irregularly - shaped field? Are there trees, flower beds, or other structures that the mower needs to work around?
For small, simple lawns, a straightforward pattern like the back - and - forth or the spiral pattern might do the trick. But for larger or more complex lawns, you'll need to be more strategic. If there are lots of obstacles, you might want to break the lawn into smaller sections and use different patterns for each.
Choosing the Right Cutting Pattern
1. Stripes Pattern
This is probably the most classic and popular pattern. It gives the lawn a neat, professional look. To create stripes, simply drive the Remote Control Lawn Mower With Tracks back and forth in parallel lines. Alternate the direction of the stripes each time you mow to prevent the grass from leaning in one direction.
One tip for getting really sharp stripes is to slightly overlap each pass. This ensures that there are no un - cut strips of grass between the lines. You can also use accessories like a roller attachment on some mowers to enhance the stripe effect.
2. Diagonal Pattern
If you want to add a bit of visual interest to your lawn, try a diagonal pattern. It's similar to the stripes pattern, but instead of mowing in straight horizontal or vertical lines, you mow at an angle. This pattern can make the lawn look larger and more dynamic.
To create a diagonal pattern, start at one corner of the lawn and mow diagonally across to the opposite corner. Then, make another pass adjacent to the first one. Keep going until the whole lawn is mowed.
3. Spiral Pattern
The spiral pattern is great for circular or oval - shaped lawns. Start at the outer edge of the lawn and gradually work your way towards the center in a spiral motion. This pattern is efficient as it minimizes the amount of turning the mower has to do.
It can also be a fun way to mow the lawn, especially if you're using a remote mower. You can watch as the mower creates a beautiful spiral shape on the grass.
4. Checkerboard Pattern
For a more complex and eye - catching look, the checkerboard pattern is a great choice. To create this pattern, mow the lawn in one direction using a normal stripes pattern. Then, mow it again at a 90 - degree angle to the first pass. This creates a grid - like checkerboard effect on the grass.
Programming and Adjusting the Mower
If your remote mower comes with programming capabilities, this is where you can really get precise with the cutting pattern. Many modern mowers allow you to set the starting point, the direction of the passes, and the distance between each pass.
Use the remote control to input the desired settings. Make sure to double - check the values before you start the mower. Some mowers also have a preview function that shows you how the pattern will look on the lawn. This can be really helpful in avoiding mistakes.
If your mower doesn't have programming features, you'll have to rely on your skills as an operator. You can use markers or stakes on the lawn to guide the mower's path. This takes a bit more practice, but with time, you'll be able to create consistent and accurate cutting patterns.
Maintenance and Safety Considerations
Setting the cutting pattern is not just about aesthetics; it's also about maintaining the health of your lawn and the safety of yourself and others. After each mowing session, make sure to clean the mower thoroughly. Remove any grass clippings, dirt, or debris from the blades and the undercarriage. This helps to prevent rust and ensures that the mower continues to work efficiently.
Also, always follow the safety guidelines when operating the remote mower. Keep children and pets away from the mowing area. Wear appropriate safety gear, such as goggles and ear protection. Make sure the mower is in good working condition before each use.
Conclusion
Setting the cutting pattern of a remote mower is a combination of understanding your machine, assessing the lawn, and choosing the right pattern. With a bit of practice and experimentation, you can create a beautiful, well - maintained lawn that will be the envy of your neighbors.
If you're in the market for a high - quality remote mower or have any questions about setting the cutting pattern, we're here to help. Contact us for more information and to discuss your specific needs. We're a leading Remote Mower supplier, and we're committed to providing you with the best products and support. Let's work together to make your lawn look its best!


References
- Lawn Care Handbook
- Remote Mower User Manuals