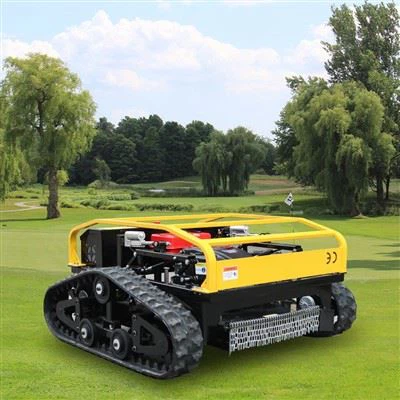
As a supplier of Remote Mowers, I often get asked about the ease of assembling these innovative gardening tools. In this blog post, I'll share my insights based on years of experience in the industry, breaking down the assembly process and discussing what makes it accessible for users of all skill levels.
Understanding the Basics of a Remote Mower
Before delving into the assembly process, it's essential to understand what a Remote Mower is. A Remote Mower is a cutting - edge piece of equipment that allows users to mow their lawns from a distance, providing convenience and safety. There are different types of remote mowers available in the market, such as the Self Propelled Garden Remote Control Lawn Mower and the Robotic Lawn Mower. Each type has its unique features, but they all share the common trait of being remotely controlled.
Unpacking the Remote Mower
The first step in assembling a remote mower is unpacking. When you receive your remote mower from our company, you'll find that it comes in a well - packed box. The packaging is designed to protect the mower during transit. Inside the box, you'll typically find the main mower unit, the remote control, a set of tools (such as wrenches and screwdrivers), and an instruction manual.
It's important to take your time when unpacking. Carefully remove each item from the box and lay them out on a clean, flat surface. Check for any visible damage to the parts. If you notice any issues, contact our customer service immediately, and we'll assist you in resolving the problem.
Assembly Steps
Step 1: Attaching the Wheels
The first major assembly task is attaching the wheels to the mower unit. Most remote mowers have pre - drilled holes on the sides of the mower body for the wheels. The wheels usually come with bolts and nuts. Simply align the holes on the wheel with the holes on the mower body, insert the bolts, and tighten the nuts using the provided wrench.
This step is relatively straightforward, even for those with limited mechanical skills. The instruction manual provides clear diagrams and step - by - step instructions to guide you through the process. It usually takes no more than 10 - 15 minutes to attach all the wheels.
Step 2: Installing the Cutting Blades
The cutting blades are a crucial part of the remote mower. They are responsible for actually cutting the grass. To install the cutting blades, you'll need to access the underside of the mower. Some mowers have a simple locking mechanism that allows you to easily open the blade housing.
Once you have access to the blade housing, place the cutting blades in the designated slots. Make sure they are properly aligned and secured. This step requires a bit more attention to detail, as the blades need to be installed correctly to ensure efficient cutting. However, with the help of the instruction manual, most users can complete this step within 15 - 20 minutes.
Step 3: Connecting the Remote Control
Connecting the remote control to the mower is an important step. The remote control communicates with the mower, allowing you to control its movement and operation. First, you'll need to insert the batteries into the remote control. Then, turn on the mower and the remote control.
Most remote mowers use a pairing process to establish a connection between the mower and the remote control. This usually involves pressing a specific button on the mower and then on the remote control. The instruction manual will provide detailed instructions on how to pair the two devices. Once paired, you can test the connection by using the remote control to move the mower forward and backward. This step typically takes about 5 - 10 minutes.
Step 4: Additional Accessories
Some remote mowers come with additional accessories, such as grass collectors or mulching kits. If your mower has these accessories, you'll need to install them. The installation process for these accessories varies depending on the type of accessory. However, in general, it involves attaching the accessory to the mower using the provided clips, screws, or other fasteners.
The installation of additional accessories may take an additional 15 - 30 minutes, depending on the complexity of the accessory.
Factors That Make Assembly Easy
One of the reasons why assembling a remote mower is relatively easy is the design of the mower itself. Our remote mowers are designed with user - friendly assembly in mind. The parts are clearly labeled, and the holes for bolts and nuts are pre - drilled, making it easy to align and attach the components.
The instruction manual is another key factor. It is written in simple, easy - to - understand language and includes detailed diagrams. Even if you've never assembled a mower before, you can follow the instructions and complete the assembly process without much difficulty.
In addition, our customer service team is always available to assist you. If you encounter any problems during the assembly process, you can contact us via email or phone, and our experts will guide you through the solution.


Comparing with Traditional Mowers
When compared to traditional mowers, the assembly of a remote mower is often easier. Traditional mowers may require more complex assembly steps, such as installing engines or carburetors. These tasks usually require a certain level of mechanical knowledge and skills.
On the other hand, remote mowers are designed to be more modular. The components are pre - assembled to a large extent, and the assembly process mainly involves attaching a few key parts. This makes it accessible to a wider range of users, including those who are not mechanically inclined.
Maintenance and Troubleshooting after Assembly
Once you've assembled your remote mower, it's important to perform some basic maintenance tasks. This includes checking the blade sharpness, lubricating the moving parts, and ensuring that the battery is fully charged.
If you encounter any problems with the mower after assembly, such as it not moving or the cutting blades not working properly, refer to the troubleshooting section in the instruction manual. Most common problems can be resolved by following the provided solutions. If the problem persists, contact our customer service, and we'll help you diagnose and fix the issue.
Conclusion
In conclusion, assembling a remote mower is a relatively easy process. With the right tools, a clear instruction manual, and a bit of patience, anyone can assemble a remote mower. Whether you're a seasoned gardener or a novice, our remote mowers are designed to be user - friendly.
If you're interested in purchasing a Remote Mower from our company, we encourage you to reach out to us for more information. Our team is ready to assist you with your purchase and provide you with all the support you need, from assembly to maintenance. Contact us today to start enjoying the convenience of remote - controlled lawn mowing.
References
- Manufacturer's instruction manual for the remote mower.
- Industry reports on the design and assembly of remote - controlled gardening equipment.